Data Guard Physical Standby (19c) Setup on Linux 8.4 Using the Data Guard Broker - Part 1/3
- ousseinioumarou68
- 1. Nov. 2021
- 7 Min. Lesezeit
Aktualisiert: 22. Okt. 2025
High level steps:
1. VirtualBox Setup
2. Oracle Linux 8.4 Installation
3. Post Linux 8.4 Installation and Configuration (users, groups, NTP, firewall, SSH….)
4. Nodes Configuration for Oracle 19c ASM Single Node Restart Installation
5. Grid Infrastructure for Single Instance Installation on both servers
6. Oracle Database Software Only Installation on both servers
7. ASM diskgroups creation to hold the database software
8. Database Creation only on primary site with DBCA
9. Database servers configuration changes et checks for standby creation
10. Create the physical standby using rman DUPLICATE
11. Post DUPLICATE configuration and Data Guard fonctionality test (Redo Log Apply)
12. Data Guard Broker Configuration
13. Post Installation Verification: Check of the whole Data Guard System Setup (Switchover, Failover, Reinstate).
Download Software:
Please download the following software:
Virtualbox
Oracle Linux Dowloads from edelivery
Assumptions/Prerequisites
Two servers (physical or VMs) with an operating system and at least oracle database software only installed. An instance is running on primary
The communication between both server work fine:
no firewall blocking issues
nothing is blocking the default listener port 1521, if you want use this.
no firewall blocking issues
General Data Guard overview and primary processes


Environment Setup Details

I. Step 1: Oracle Virtualbox Setup
1. Check and change the virtualbox preferences, if necessary


II. Step 2: Install Oracle Linux 8.4
Power on the machine. Optionally, you can first test the Installation media.


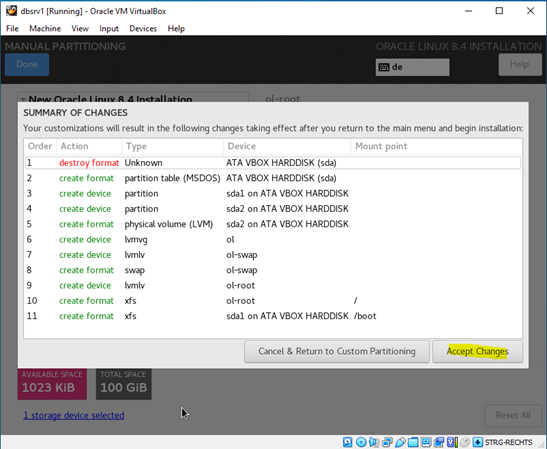
Customize the partition


I have disabled KDUMP for my Home Lab

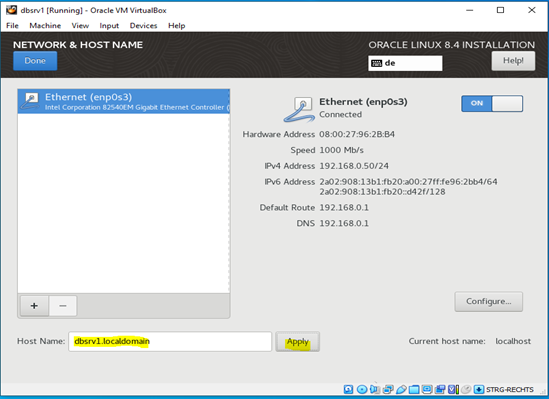
Configure the network Adapter. I would rather set IP address manually to avoid it changing from DHCP.

I have also disabled the security policy for my Home Lab.

Specify the root password

You can optionally create a user

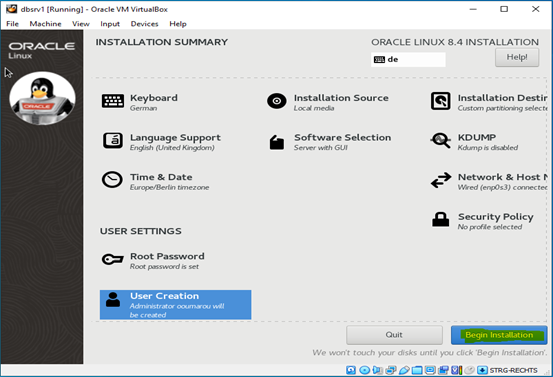
Review the Installation summary and Select to begin the Installation.
You might monitor the Installation progress.

When done, then select to reboot.

Accept the License agreement.

Select Finish configuration to close the installation.

III. Step 3: Post Linux 8.4 Installation and Configuration
Login to the System, as root to check the system and to proceed with post installation configuration.


1. Verify the initial installation
Make the basic verifcation of the system: uname -na, df-lh, free -w etc.

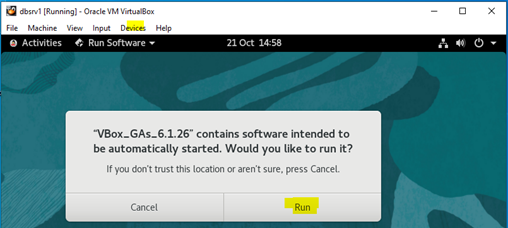
2. Install VirtualBox Guest Additions, Change Display resolution and others
Install VirtualBox Guest Additions, Change the Display resolution and others

VirtualBox Guest Additions Installation Error:
Error: Kernel headers not found for target kernel 5.4-17-2102.201.3.el8uek.x86_64
Solution: Check the loaded Kernel headers: rpm -qa | grep -i header

Change the boot ordert o boot with the loaded Kernel if you can not load the required kernel headers with yum update or install.

Reboot and try Guest Additions Installation again


Now the VirtualBox Guest Additions Installation completes successfully!
3. dnf update
Note: If you did a minimal installation, but you want a GUI desktop, log in and issue the following commands from the console to install the desktop packages and reboot:
# dnf update -y
# dnf groupinstall -y "GNOME"
# dnf install -y gdm
# systemctl enable gdm
# systemctl set-default graphical.target
# reboot


4 SELinux change to permisse
If the OS is to be used for an Oracle installation, it is easier if Secure Linux (SELinux) is disabled or switched to permissive. To do this edit the "/etc/selinux/config" file, making sure the SELINUX flag is set as follows.
[root@dbsrv1 ~]# grep SELINUX /etc/selinux/config
[root@dbsrv1 ~]# vim /etc/selinux/config
[root@dbsrv1 ~]# grep SELINUX /etc/selinux/config

5. Firewall disabling
If the OS is to be used for an Oracle installation, you will need to disable or configure the local firewall, as shown here. To disable it, do the following as the "root" user.
#systemctl status firewalld
#systemctl stop firewalld
#systemctl status firewalld
#systemctl disable firewalld


6. SSH Configuration
Make sure the SSH daemon is started using the following commands.
[root@dbsrv1 ~]# systemctl status sshd.service
[root@dbsrv1 ~]# systemctl start sshd.service
[root@dbsrv1 ~]# systemctl enable sshd.service

7. Hostname & /etc/hosts file
The "/etc/hosts" file must contain a fully qualified name for the server.
[root@dbsrv1 ~]# hostnamectl status
[root@dbsrv1 ~]# cat /etc/hosts
[root@dbsrv1 ~]#
The second server will be the standby site
[root@dbsrv1 ~]# cat /etc/hosts
127.0.0.1 localhost localhost.localdomain localhost4 localhost4.localdomain4
::1 localhost localhost.localdomain localhost6 localhost6.localdomain6
192.168.0.50 dbsrv1.localdomain dbsrv1
192.168.0.51 dbsrv2.localdomain dbsrv2
[root@dbsrv1 ~]#
8. Oracle Installation prerequisites: automativ setup script
Perform either the Automatic Setup or the Manual Setup to complete the basic prerequisites. The Additional Setup is required for all installations.
8.1 Automatic setup
If you plan to use the "oracle-database-preinstall-19c" package to perform all your prerequisite setup, issue the following command.
# dnf install -y oracle-database-preinstall-19c
[root@dbsrv1 ~]# dnf install -y oracle-database-preinstall-19c

It is probably worth doing a full update as well, but this is not strictly speaking necessary.
# yum update -y
Change oracle user password
Set the password fort he oracle user
[root@dbsrv1 ~]# passwd oracle
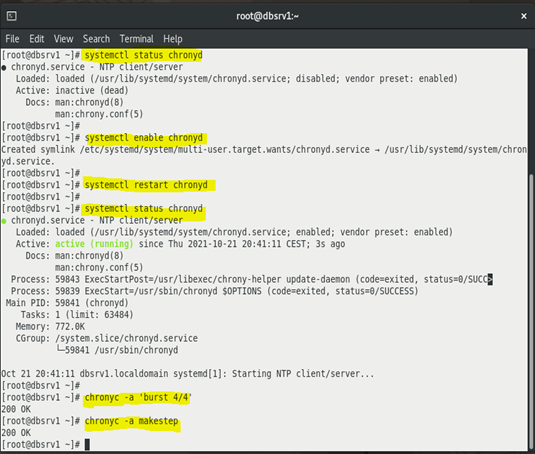
9. NTP configuration
Make sure NTP is enabled.
# systemctl enable chronyd
# systemctl restart chronyd
# chronyc -a 'burst 4/4'
# chronyc -a makestep
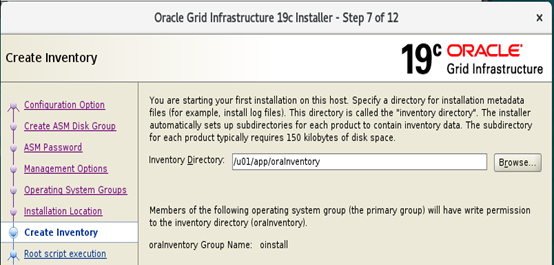
10. Create the directories to hold the oracle software
[root@dbsrv1 ~]# mkdir -p /u01/app/19.3.0/grid
[root@dbsrv1 ~]# mkdir -p /u01/app/oracle/product/19.3.0/db_1
[root@dbsrv1 ~]# chown -R oracle:oinstall /u01
[root@dbsrv1 ~]# chmod -R 775 /u01/
[root@dbsrv1 ~]#
11. Create .bash_profile and the aliases db_env and grid_env
Log in as the "oracle" user and add the following lines at the end of the "/home/oracle/.bash_profile" file and the aliases:
db_env for database environment
grid_env for grid infrastructure (Oracle Restart) environment
[root@dbsrv1 ~]# su - oracle
[oracle@dbsrv1 ~]$ cp .bash_profile .bash_profile.orig
[oracle@dbsrv1 ~]$
[oracle@dbsrv1 ~]$ vi .bash_profile
[oracle@dbsrv1 ~]$ vim .bash_profile
[oracle@dbsrv1 ~]$

Create a file called "/home/oracle/grid_env" with the following contents.
Create a file called "/home/oracle/db_env" with the following contents.
Once the "/home/oracle/.bash_profile" has been run, you will be able to switch between environments
as follows:
$ . grid_env
$ echo $ORACLE_HOME
/u01/app/19.3.0/grid
$ . db_env
$ echo $ORACLE_HOME
/u01/app/oracle/product/19.3.0/db_1

12. Download and Install oraclasmlib and oracleasm support packages
[root@dbsrv1 ~]# cd /tmp
[root@dbsrv1 tmp]# wget https://download.oracle.com/otn_software/asmlib/oracleasmlib-2.0.17-1.el8.x86_64.rpm
[root@dbsrv1 tmp]# wget https://public-yum.oracle.com/repo/OracleLinux/OL8/addons/x86_64/getPackage/oracleasm-support-2.1.12-1.el8.x86_64.rpm
[root@dbsrv1 tmp]# rpm -Uvh oracleasmlib-2.0.17-1.el8.x86_64.rpm
[root@dbsrv1 tmp]# rpm -Uvh oracleasm-support-2.1.12-1.el8.x86_64.rpm

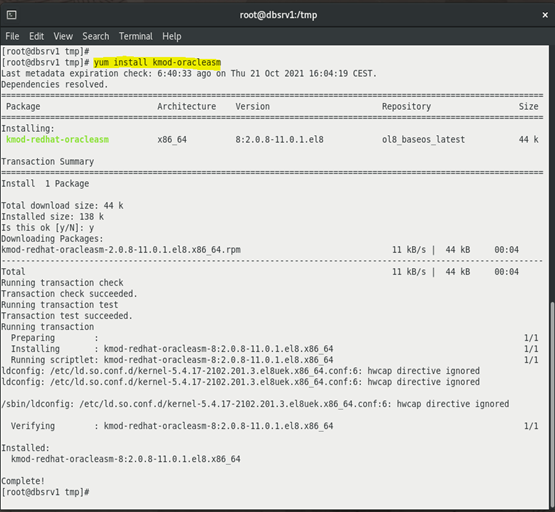
13. Install kmod-oracleasm
[root@dbsrv1 tmp]# yum install kmod-oracleasm
14. Configure and load ASM modules
[root@dbsrv1 tmp]# oracleasm configure -i

Load the oracleasm kernel module
[root@dbsrv1 tmp]# /usr/sbin/oracleasm init

IV. Step 4: Nodes Configuration for Oracle 19c ASM Single Node Restart Installation
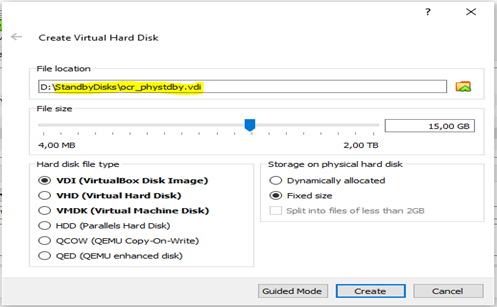
1. Creating VirtualBox disks for ASM disks and diskgroups
Create ASM disks for the primary database, with naming: XXX_PRIMARY

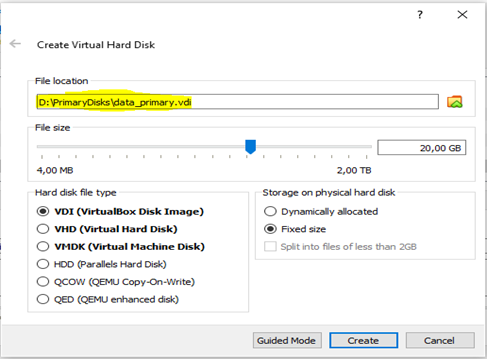

Create ASM disks for the primary database, with naming: XXX_PRIMARY


2. Shutdown and clone dbsrv1: Export & Import Virtual Appliance

Change the name of the virtualbox appliance to dbsrv2, and optionally also the diskname and location. I have placed dbsrv2 on a seperate SSD.


3. Attach the ASM disks to the servers
XXX_PRIMARY to the primary database: dbsrv1
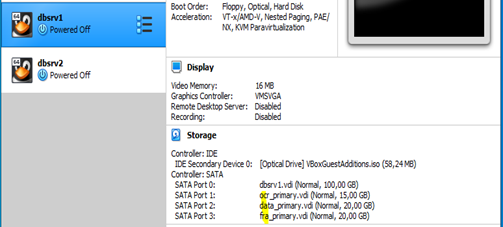
XXX_PHYSTDBY to the standby database: dbsrv2

4. Start the primary server (dbsrv1) and configure ASM disks
4.1 Format the disks
[root@dbsrv1 ~]# fdisk -l | grep "Disk /dev/sd"
[root@dbsrv1 ~]# fdisk /dev/sdb
[root@dbsrv1 ~]# fdisk /dev/sdc
[root@dbsrv1 ~]# fdisk /dev/sdd
[root@dbsrv1 ~]#

4.2 Verify the formatting
[root@dbsrv1 ~]# fdisk -l | grep "/dev/sd"

4.3 Create the ASM Disks
[root@dbsrv1 ~]# fdisk -l | grep "/dev/sd"
[root@dbsrv1 ~]# oracleasm createdisk OCR_PRIM /dev/sdb1
[root@dbsrv1 ~]# oracleasm createdisk DATA_PRIM /dev/sdc1
[root@dbsrv1 ~]# oracleasm createdisk FRA_PRIM /dev/sdd1
[root@dbsrv1 ~]# oracleasm scandisks
[root@dbsrv1 ~]# oracleasm listdisks
[root@dbsrv1 ~]# ls -l /dev/oracleasm/disks/
[root@dbsrv1 ~]#

5. Start the standby server (dbsrv2) for post clone configuration
Power on the cloned VirtualBox Appliance and change the IP and hostname and confgure ASM Disks.


5.1 Format the disks
Repeat the partitioning for /dev/sbc, /dev/sdd and create ASM disks
[root@dbsrv2 ~]# fdisk -l | grep "/dev/sd"

5.2 Configure the ASM disks on dbsrv2
[root@dbsrv2 ~]# oracleasm createdisk OCR_STBY /dev/sdb1
[root@dbsrv2 ~]# oracleasm createdisk DATA_STBY /dev/sdc1
[root@dbsrv2 ~]# oracleasm createdisk FRA_STBY /dev/sdd1
[root@dbsrv2 ~]# oracleasm scandisks
[root@dbsrv2 ~]# oracleasm listdisks
[root@dbsrv2 ~]# ls -l /dev/oracleasm/disks/
[root@dbsrv2 ~]#

Reboot dbsrv2 and check the connection between both nodes ping, ssh

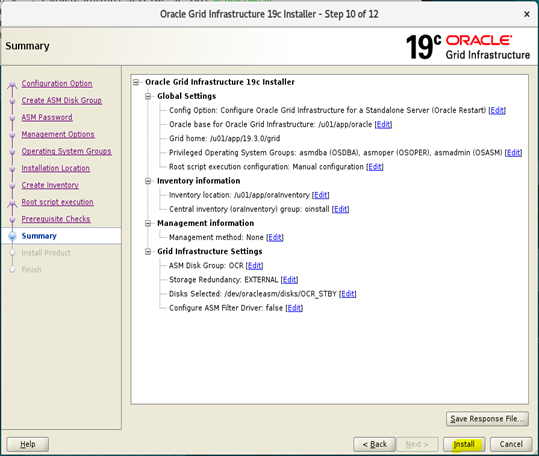
V. Step 5: Oracle 19c Restart Installation on primary and standby database servers
5.1 Oracle Restart Installation on primary database server: dbsrv1
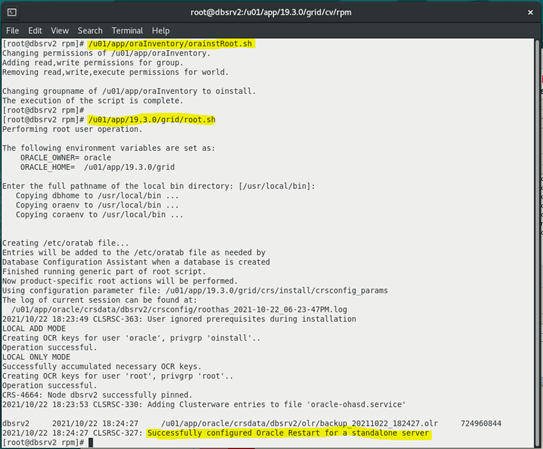
Copy and unzip the grid infrastructure software to $GRID_HOME on both primary and pyhsical standby sites.


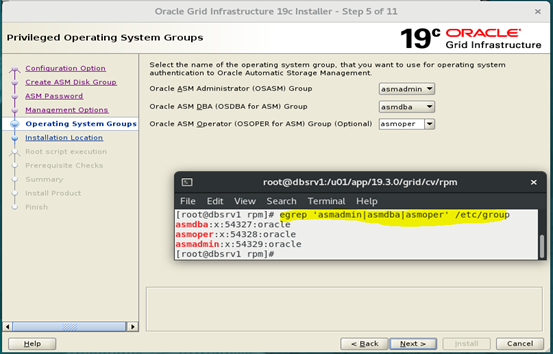
Install the cvuqdisk RPM package as root
[root@dbsrv1 etc]# cd /u01/app/19.3.0/grid/cv/rpm/
[root@dbsrv1 rpm]# ls -l cvuqdisk-1.0.10-1.rpm
[root@dbsrv1 rpm]# rpm -Uvh cvuqdisk-1.0.10-1.rpm

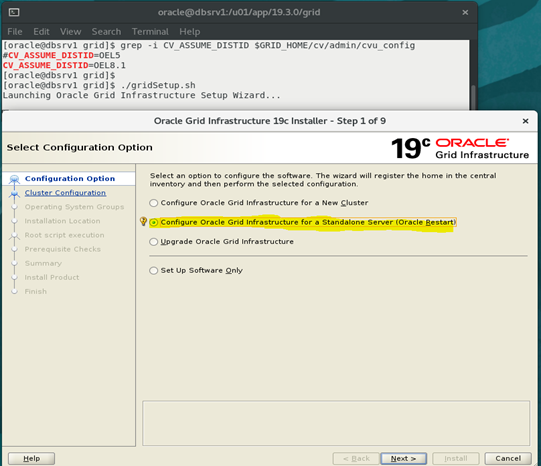
Now, as oracle user: install the grid infrastructure for Single Server not for RAC.
Set DISPLAY and grid home environment properly, then start the grid infrastructure installation
[root@dbsrv1 etc]# echo $DISPLAY
:0
[root@dbsrv1 etc]#
[root@dbsrv1 etc]# xhost +
access control disabled, clients can connect from any host
[root@dbsrv1 etc]#
[root@dbsrv1 etc]# su - oracle
[oracle@dbsrv1 ~]$ export DISPLAY=:0
[oracle@dbsrv1 ~]$
[oracle@dbsrv1 ~]$ . grid_env
[oracle@dbsrv1 ~]$ env | egrep 'GRID|ORA'
ORACLE_UNQNAME=CDBDG
ORACLE_SID=+ASM
ORACLE_BASE=/u01/app/oracle
ORACLE_HOME=/u01/app/19.3.0/grid
GRID_HOME=/u01/app/19.3.0/grid
ORACLE_TERM=xterm
ORACLE_HOSTNAME=dbsrv1.localdomain
[oracle@dbsrv1 ~]$ cd $GRID_HOME
[oracle@dbsrv1 grid]$ ls -l gridSetup.sh
-rwxr-x---. 1 oracle oinstall 3294 Mar 8 2017 gridSetup.sh
[oracle@dbsrv1 grid]$
[oracle@dbsrv1 grid]$ ./gridSetup.sh


ERROR: [INS-08101] Unexpected error while executing the action at state: ‘supportedOSCheck’.
Solution: see links below. I used Workaround 2. Permanent Fix: Edit the file $ORACLE_HOME/cv/admin/cvu_config using any editing tool and add a new line CV_ASSUME_DISTID=OEL8.1, followed by saving the file.
[oracle@dbsrv1 grid]$ vi $GRID_HOME/cv/admin/cvu_config
[oracle@dbsrv1 grid]$ grep -i CV_ASSUME_DISTID $GRID_HOME/cv/admin/cvu_config
#CV_ASSUME_DISTID=OEL5
CV_ASSUME_DISTID=OEL8.1
[oracle@dbsrv1 grid]$
For more details see:
Solution for [INS-08101] Unexpected error ‘supportedOSCheck’ while Oracle 19C Installation
In this article we will solve error [INS-08101] Unexpected error while executing the action at state: ‘supportedOSCheck’.


Installation logs details on primary site

5.1 Oracle Restart Installation on standby database server: dbsrv2


Installation logs details on standby site

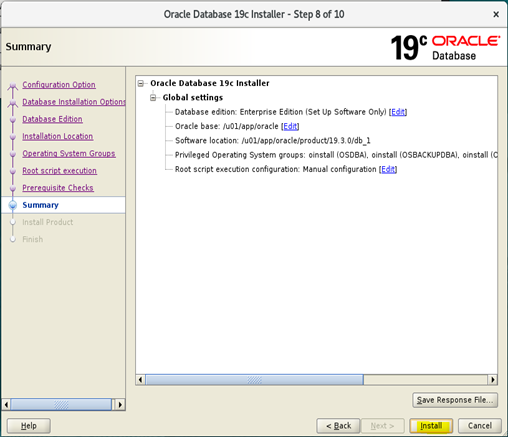
VI. Step 6: Oracle database software only installation on both servers
6.1 On primary database server
Set the oracle user environment variables for database home properly and unzip the xxxx.db_home.zip to $ORACLE_HOME on both servers

Set DISPLAY and start runInstaller for Database Software only installation
By the ERROR: [INS-08101] Unexpected error while executing the action at state: ‘supportedOSCheck’, apply the workaround as already done above
Solution: see links below. I used Workaround 2. Permanent Fix: Edit the file $ORACLE_HOME/cv/admin/cvu_config using any editing tool and add a new line CV_ASSUME_DISTID=OEL8.1, followed by saving the file.

Add the workaround 2 as explained above. Now execute runInstaller again


Change the groups


The installation is successfully finished. Close the GUI

You can find the installtion log files here:

6.2 On standby database server
Runinstaller on standby site, with the workaround 2, as explained above.


The installation is successfully finished. Close the GUI

You can find the installtion log files here:

Check the grid infrastructure installation for Oracle Restart: dbsrv1

Check the grid infrastructure installation for Oracle Restart: dbsrv2

VII. Step 7: Create diskgroups to hold the database
Create additional Diskgroup DATA, FRA on both nodes to hold the oracle database
7.1 Diskgroups creation on primary database server: dbsrv1

7.2 Diskgroups creation on standby database server: dbsrv2

The next steps will be documented in part 2/3 and part 3/3.
####################################################
Here you can find the other articles:
Part 2/3:
Part 3/3:
####################################################


Kommentare