Oracle database RAC 19c: Grid infrastructure and Database Installation Part 2 of 2
- ousseinioumarou68
- 31. Okt. 2021
- 7 Min. Lesezeit
Aktualisiert: 22. Okt. 2025
IV. Step 4: Oracle RAC19c Grid Infrastructure Pre-Installation Check
1. Assumptions/Prerequisites
Same operating system on both nodes installed , here Oracle Linux 7.9
Firewall is disabled, SELinux set to permisse
Oracle preinstallation is done (users, groups, directories, preinstallation script)
NTP is configured here Chrony
Oracle ASMLib configured, at least a Diskgroup for OCR is created.
DNS is configured and SCAN IPs are resolvable
Optionally passwordless SSH can be configured
[oracle@oradbhost1 ~]$ nslookup oradbhost-scan
Server: 192.168.0.101
Address: 192.168.0.101#53
Name: oradbhost-scan.localdomain
Address: 192.168.0.105
Name: oradbhost-scan.localdomain
Address: 192.168.0.103
Name: oradbhost-scan.localdomain
Address: 192.168.0.104
[oracle@oradbhost1 ~]$
[oracle@oradbhost1 ~]$ nslookup 192.168.0.103
103.0.168.192.in-addr.arpa name = oradbhost-scan.localdomain.
[oracle@oradbhost1 ~]$

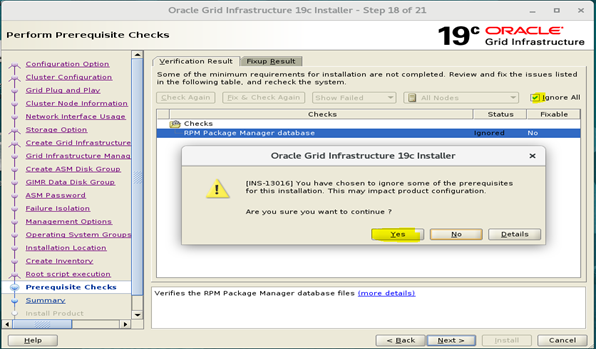
2. Pre-check for Oracle RAC Installation
For every oracle CRS or RAC installation it is recommended to run a verification and validation using the Cluvfy Pre-check for grid installation readyness
[root@oradbhost1 ~]# su - oracle
[oracle@oradbhost1 ~]$ . grid_env
[oracle@oradbhost1 ~]$ cd $GRID_HOME
[oracle@oradbhost1 grid]$ ls -l runcluvfy.sh
[oracle@oradbhost1 grid]$ ./runcluvfy.sh stage -pre crsinst -networks enp0s3:192.168.0.0:PUBLIC/enp0s8:192.168.1.0:cluster_interconnect -n oradbhost1,oradbhost2 -verbose


V. Step 5: Grid Infrastructure 19c Installation
Check the Display as root and enable xhost
[root@oradbhost1 ~]# echo $DISPLAY
:0
[root@oradbhost1 ~]#
[root@oradbhost1 ~]# xhost +
access control disabled, clients can connect from any host
[root@oradbhost1 ~]#
Switch to oracle user, export the DISPLAY and set the environment properly for GRID Installation.
[root@oradbhost1 ~]# su - oracle
Last login: Sun Oct 17 17:03:48 CEST 2021 on pts/0
[oracle@oradbhost1 ~]$
[oracle@oradbhost1 ~]$ export DISPLAY=:0
[oracle@oradbhost1 ~]$
[oracle@oradbhost1 ~]$ echo $DISPLAY
:0
[oracle@oradbhost1 ~]$
[oracle@oradbhost1 ~]$ . grid_env
[oracle@oradbhost1 ~]$
[oracle@oradbhost1 ~]$ env | egrep 'ORA|GRID'
ORACLE_UNQNAME=CDBRAC
ORACLE_SID=+ASM1
ORACLE_BASE=/u01/app/oracle
ORACLE_HOSTNAME=oradbhost1.localdomain
ORACLE_TERM=xterm
GRID_HOME=/u01/app/19.3.0/grid
ORACLE_HOME=/u01/app/19.3.0/grid
[oracle@oradbhost1 ~]$
[oracle@oradbhost1 ~]$ cd $GRID_HOME
[oracle@oradbhost1 grid]$
[oracle@oradbhost1 grid]$ ls -l gridSetup.sh
-rwxrwxr-x. 1 oracle oinstall 3294 Mar 8 2017 gridSetup.sh
[oracle@oradbhost1 grid]$
Then start the grid infrastructure Installation.
Note: There is no grid user, only oracle user for both grid infrastructure and database installation
[oracle@oradbhost1 grid]$ ./gridSetup.sh
Launching Oracle Grid Infrastructure Setup Wizard...


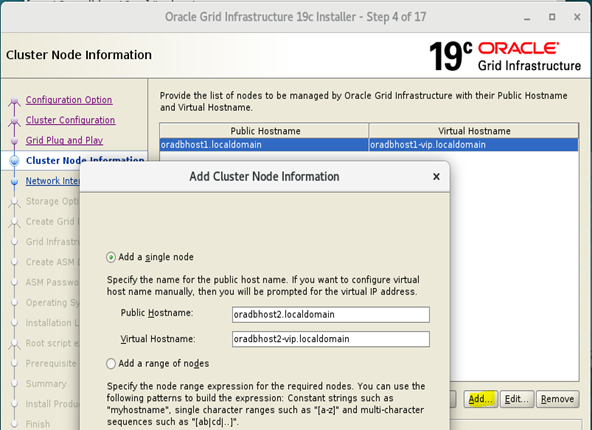
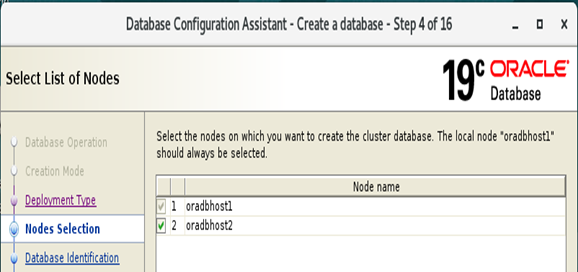
SSH Connectivity: Click the SSH connectivity button and enter the password for the oracle user. ClickTest button to test it once it is complete. Once the test is complete, click the Next button.


Click Next
ERROR: [INS-40912]Virtual host name…is assigned to another system on the network

Solution: bring down the VIP interfaces on both nodes and retry again., here enp0s9


1. Executing Configuration Scripts on both nodes
1.1 orainstRoot.sh on both nodes: oradbhost1, oradbhost2
[root@oradbhost1 ~]# /u01/app/oraInventory/orainstRoot.sh
Changing permissions of /u01/app/oraInventory.
Adding read,write permissions for group.
Removing read,write,execute permissions for world.
Changing groupname of /u01/app/oraInventory to oinstall.
The execution of the script is complete.
[root@oradbhost1 ~]#
[root@oradbhost1 ~]# ssh oradbhost2
Last login: Sun Oct 17 18:31:40 2021 from oradbhost1.localdomain
[root@oradbhost2 ~]#
[root@oradbhost2 ~]# /u01/app/oraInventory/orainstRoot.sh
Changing permissions of /u01/app/oraInventory.
Adding read,write permissions for group.
Removing read,write,execute permissions for world.
Changing groupname of /u01/app/oraInventory to oinstall.
The execution of the script is complete.
[root@oradbhost2 ~]#

1.2 root.sh on first node: oradbhost1
[root@oradbhost1 ~]# /u01/app/19.3.0/grid/root.sh
Performing root user operation.
The following environment variables are set as:
ORACLE_OWNER= oracle
ORACLE_HOME= /u01/app/19.3.0/grid
Enter the full pathname of the local bin directory: [/usr/local/bin]:
The contents of "dbhome" have not changed. No need to overwrite.
The contents of "oraenv" have not changed. No need to overwrite.
The contents of "coraenv" have not changed. No need to overwrite.
Creating /etc/oratab file...
Entries will be added to the /etc/oratab file as needed by
Database Configuration Assistant when a database is created
Finished running generic part of root script.
Now product-specific root actions will be performed.
Relinking oracle with rac_on option
Using configuration parameter file: /u01/app/19.3.0/grid/crs/install/crsconfig_params
The log of current session can be found at:
/u01/app/oracle/crsdata/oradbhost1/crsconfig/rootcrs_oradbhost1_2021-10-17_07-14-24PM.log
2021/10/17 19:14:33 CLSRSC-594: Executing installation step 1 of 19: 'SetupTFA'.
2021/10/17 19:14:34 CLSRSC-594: Executing installation step 2 of 19: 'ValidateEnv'.
2021/10/17 19:14:34 CLSRSC-363: User ignored prerequisites during installation
2021/10/17 19:14:34 CLSRSC-594: Executing installation step 3 of 19: 'CheckFirstNode'.
2021/10/17 19:14:35 CLSRSC-594: Executing installation step 4 of 19: 'GenSiteGUIDs'.
2021/10/17 19:14:35 CLSRSC-594: Executing installation step 5 of 19: 'SetupOSD'.
2021/10/17 19:14:35 CLSRSC-594: Executing installation step 6 of 19: 'CheckCRSConfig'.
2021/10/17 19:14:35 CLSRSC-594: Executing installation step 7 of 19: 'SetupLocalGPNP'.
2021/10/17 19:14:46 CLSRSC-594: Executing installation step 8 of 19: 'CreateRootCert'.
2021/10/17 19:14:49 CLSRSC-594: Executing installation step 9 of 19: 'ConfigOLR'.
2021/10/17 19:14:54 CLSRSC-4002: Successfully installed Oracle Trace File Analyzer (TFA) Collector.
2021/10/17 19:14:59 CLSRSC-594: Executing installation step 10 of 19: 'ConfigCHMOS'.
2021/10/17 19:15:00 CLSRSC-594: Executing installation step 11 of 19: 'CreateOHASD'.
2021/10/17 19:15:03 CLSRSC-594: Executing installation step 12 of 19: 'ConfigOHASD'.
2021/10/17 19:15:03 CLSRSC-330: Adding Clusterware entries to file 'oracle-ohasd.service'
2021/10/17 19:15:23 CLSRSC-594: Executing installation step 13 of 19: 'InstallAFD'.
2021/10/17 19:15:27 CLSRSC-594: Executing installation step 14 of 19: 'InstallACFS'.
2021/10/17 19:15:30 CLSRSC-594: Executing installation step 15 of 19: 'InstallKA'.
2021/10/17 19:15:33 CLSRSC-594: Executing installation step 16 of 19: 'InitConfig'.
ASM has been created and started successfully.
[DBT-30001] Disk groups created successfully. Check /u01/app/oracle/cfgtoollogs/asmca/asmca-211017PM071608.log for details.
2021/10/17 19:16:57 CLSRSC-482: Running command: '/u01/app/19.3.0/grid/bin/ocrconfig -upgrade oracle oinstall'
CRS-4256: Updating the profile
Successful addition of voting disk 78fad8fa90874fdfbf3e4741fc2c741a.
Successfully replaced voting disk group with +OCR.
CRS-4256: Updating the profile
CRS-4266: Voting file(s) successfully replaced
## STATE File Universal Id File Name Disk group
-- ----- ----------------- --------- ---------
1. ONLINE 78fad8fa90874fdfbf3e4741fc2c741a (/dev/oracleasm/disks/OCR_DISK) [OCR]
Located 1 voting disk(s).
2021/10/17 19:18:12 CLSRSC-594: Executing installation step 17 of 19: 'StartCluster'.
2021/10/17 19:19:14 CLSRSC-343: Successfully started Oracle Clusterware stack
2021/10/17 19:19:14 CLSRSC-594: Executing installation step 18 of 19: 'ConfigNode'.
2021/10/17 19:20:26 CLSRSC-594: Executing installation step 19 of 19: 'PostConfig'.
[INFO] [DBT-30001] Disk groups created successfully. Check /u01/app/oracle/cfgtoollogs/asmca/asmca-211017PM072030.log for details.
2021/10/17 19:21:01 CLSRSC-325: Configure Oracle Grid Infrastructure for a Cluster ... succeeded
[root@oradbhost1 ~]#


1.3 root.sh on second node: oradbhost2

Click OK after successfully execution of the root.sh on both nodes


The installation is finished. You can verify the log files

2. Grid Infrastructure 19c Post Installation Check
2.1 Verification on node 1:
[oracle@oradbhost1 ~]$ ocrcheck
Status of Oracle Cluster Registry is as follows :
Version : 4
Total space (kbytes) : 491684
Used space (kbytes) : 84504
Available space (kbytes) : 407180
ID : 892411172
Device/File Name : +OCR
Device/File integrity check succeeded
Device/File not configured
Device/File not configured
Device/File not configured
Device/File not configured
Cluster registry integrity check succeeded
Logical corruption check bypassed due to non-privileged user
[oracle@oradbhost1 ~]$
[oracle@oradbhost1 ~]$ crsctl status server
NAME=oradbhost1
STATE=ONLINE
NAME=oradbhost2
STATE=ONLINE
[oracle@oradbhost1 ~]$ crsctl check cluster
CRS-4537: Cluster Ready Services is online
CRS-4529: Cluster Synchronization Services is online
CRS-4533: Event Manager is online
[oracle@oradbhost1 ~]$
[oracle@oradbhost1 ~]$ crsctl check crs
CRS-4638: Oracle High Availability Services is online
CRS-4537: Cluster Ready Services is online
CRS-4529: Cluster Synchronization Services is online
CRS-4533: Event Manager is online
[oracle@oradbhost1 ~]$
[oracle@oradbhost1 ~]$ crsctl query css votedisk
## STATE File Universal Id File Name Disk group
-- ----- ----------------- --------- ---------
1. ONLINE 78fad8fa90874fdfbf3e4741fc2c741a (/dev/oracleasm/disks/OCR_DISK) [OCR]
Located 1 voting disk(s).
[oracle@oradbhost1 ~]$ crsctl query crs activeversion
Oracle Clusterware active version on the cluster is [19.0.0.0.0]
[oracle@oradbhost1 ~]$
[oracle@oradbhost1 ~]$ crsctl query crs releaseversion
Oracle High Availability Services release version on the local node is [19.0.0.0.0]
[oracle@oradbhost1 ~]$
[oracle@oradbhost1 ~]$ crsctl query crs softwareversion
Oracle Clusterware version on node [oradbhost1] is [19.0.0.0.0]
[oracle@oradbhost1 ~]$


2.2 Verification on node 2:

3. Creating additional ASM diskgroups for Oracle Database installation
Create additional ASM Diskgroup for Oracle Database Installation, as you need for example, DATA_DISK, FRA.. using asmca
Listing ASM Diskgroups: asmcmd lsdg

Diskgroups Creation: asmca à Diskgroups à create


Now The RAC System is ready for Database Software Installation.
VI. Step 6: Oracle RAC 19c on Oracle Linux 7.9: Database Software Only Installation
1. Assumptions/ Prerequisites
Oracle Linux 7.9 installed and configured for oracle RAC installation
Grid Infrastructure for RAC 19c installed and additional Diskgroups for Database Installation have been created.
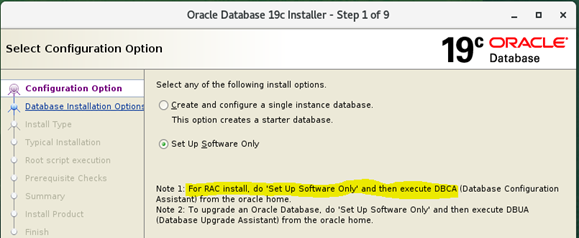
2. Database Software Only Installation
Check and Set Display and environment variables for Oracle Database home installation. Then execute the runInstaller command from the ORACLE_HOME, as oracle user.
Checking DISPLAY as root
[root@oradbhost1 ~]# echo $DISPLAY
:0
[root@oradbhost1 ~]# xhost +
access control disabled, clients can connect from any host
[root@oradbhost1 ~]#
Switch to user oracle and set ENV variables and DISPLAY
[root@oradbhost1 ~]# su - oracle
Last login: Mon Oct 18 10:43:29 CEST 2021
[oracle@oradbhost1 ~]$
[oracle@oradbhost1 ~]$ . db_env
[oracle@oradbhost1 ~]$
[oracle@oradbhost1 ~]$ ps -ef | grep [p]mon
oracle 4001 1 0 10:11 ? 00:00:00 asm_pmon_+ASM1
oracle 6452 1 0 10:12 ? 00:00:00 mdb_pmon_-MGMTDB
[oracle@oradbhost1 ~]$
[oracle@oradbhost1 ~]$ env | grep ORA
ORACLE_UNQNAME=CDBRAC
ORACLE_SID=cdbrac1
ORACLE_BASE=/u01/app/oracle
ORACLE_HOSTNAME=oradbhost1.localdomain
ORACLE_TERM=xterm
ORACLE_HOME=/u01/app/oracle/product/19.3.0/db_1
[oracle@oradbhost1 ~]$
[oracle@oradbhost1 db_1]$ export DISPLAY=:0
[oracle@oradbhost1 db_1]$
Start the Software only Installation
Copy the database software and unzip it in the $ORACLE_HOME
[oracle@oradbhost1 ~]$ cd $ORACLE_HOME
[oracle@oradbhost1 db_1]$
[oracle@oradbhost1 db_1]$ unzip LINUX.X64_193000_db_home.zip
[oracle@oradbhost1 db_1]$ ls -l runInstaller
-rwxr-x---. 1 oracle oinstall 1783 Mar 8 2017 runInstaller
[oracle@oradbhost1 db_1]$
Verify that the cluster is running (ASM instance) and Start the installation
[oracle@oradbhost1 db_1]$ ./runInstaller


3. Execute root.sh on both nodes
Execute root.sh on both nodes and click OK
[root@oradbhost1 ~]# /u01/app/oracle/product/19.3.0/db_1/root.sh
[root@oradbhost1 ~]# ssh oradbhost2
[root@oradbhost2 ~]# /u01/app/oracle/product/19.3.0/db_1/root.sh

Close the Software Only Installation

You can find the log of this installation

Next step is Database Creation using DBCA.
VII: Step 7: Oracle RAC 19c on Oracle Linux 7.9 Database Creation with DBCA
1. Assumptions/ Prerequisites
Verify ASM Diskgroups existence before executing dbca, here as oracle user with the grid infrastructure environment variables properly set.

2. Database Creation with DBCA
Set the environment variables properly for ORACLE_HOME and not GRID_HOME
Set DISPLAY and execute runInstaller
[oracle@orahost1 db_1]$ date
Fri 15 Oct 22:07:56 CEST 2021
[oracle@orahost1 db_1]$ ps -ef | grep [p]mon
oracle 4248 1 0 20:31 ? 00:00:00 asm_pmon_+ASM1
[oracle@orahost1 db_1]$ env | grep ORA
ORACLE_UNQNAME=CDBRAC
ORACLE_SID=cdbrac1
ORACLE_BASE=/u01/app/oracle
ORACLE_HOSTNAME=orahost1.localdomain
ORACLE_TERM=xterm
ORACLE_HOME=/u01/app/oracle/product/19.3.0/db_1
[oracle@orahost1 db_1]$
[oracle@orahost1 db_1]$ which dbca
/u01/app/oracle/product/19.3.0/db_1/bin/dbca
[oracle@orahost1 db_1]$
[oracle@orahost1 db_1]$ dbca


You can monitor the progress or have a look on the DBCA log or alert log

Check the Password Management to modify an account. For example I have unlock DBSNMP account. Then click Close to close the Database Creation.

3. Post Database Creation Verification
3.1 Check Database config status and Instances
[oracle@oradbhost1 ~]$ ps -ef | grep [p]mon
oracle 4001 1 0 Oct18 ? 00:00:02 asm_pmon_+ASM1
oracle 6452 1 0 Oct18 ? 00:00:02 mdb_pmon_-MGMTDB
oracle 14981 1 0 Oct18 ? 00:00:02 ora_pmon_cdbrac1
[oracle@oradbhost1 ~]$
[oracle@oradbhost1 ~]$ srvctl config database -d cdbrac

3.2 Check the instance/SQLPlus
sqlplus / as sysdba
col instance_name format a30
col instance_name format a30
col instance_name format a30
set lines 100
select instance_name, host_name from v$instance;
select inst_number, inst_name from v$active_instance;

3.2 Check the RAC status
With the grid infrastructure environment set:
crsctl stat res –t

3.3 Check Instance and Listener on the 2nd RAC node
ps –ef | grep [p]mon
ps –ef | grep [l]sn

Here you're! That is! I hope, I could share my RAC experiences with you!
Enjoy and regards
Ousseini Oumarou


Kommentare