Oracle Database RAC 19c Installation on Oracle Linux 7.9 Using VirtualBox Part 1 of 2
- ousseinioumarou68
- 31. Okt. 2021
- 15 Min. Lesezeit
Aktualisiert: 22. Okt. 2025
Description and Scope
In this article I will describe the steps to setup a two nodes Oracle RAC 19c on Oracle Linux 7.9 using VirtualBox.
For a RAC system at least 2 nodes are required, as well shared storage and since Oracle 11g R2, also a DNS for SCAN IPs to be resolved. These requirements of shared storage and DNS resolution are one of the biggest obstacles preventing people from setting up test RAC environment.
Storage is very expensive. In a company the required shared storage is often provided by a SAN or high-end NAS device and probably by the storage team and the DNS configuration is handled by the network or operating system teams.
When you want to get some experiences in installing and using RAC, a cheaper alternative is to use virtualization to „fake“ shared storage and to build up a simple DNS server. You can have a DNS server as a separate machine or use one of the RAC nodes. I will go for the second option and thus, I will configure the DNS on the first node (oradbhost1).
I am neither a storage guy nor an administrator for network and operating system. I would like just to share my experiences.
Setup Environment Details

Oracle RAC 19c Environment Details

NOTE: The adapter of the private interconnect should be on different subnet,
otherwise the grid infrastructure installation will fail.
High level steps:
Virtualbox Setup for Oracle Linux 7.9 (OEL 7.9) Installation
Oracle Linux 7.9 Installation
Oracle Linux Post Installation Configuration for RAC (groups, users, DNS, firewall, NTP/Chrony, cloning 1st node, shared Disks, ASM configuration)
Grid Infrastructure Pre-check for RAC Setup
Grid Infrastructure Installation and Configuration
Oracle Database Software Only Installation
Oracle 19c Database Creation using DBCA
Post Installation Verification: Check of the whole RAC System Setup
Download Software:
Please download the following software:
Virtualbox
Oracle Linux Dowloads from edelivery
Oracle Database 19c from edelivery
I. Step 1: Oracle Virtualbox Setup
1. Check and change the virtualbox preferences, if necessary

2. Specify hostname and operating system type (Linux)

3. Memory Size
Specify the memory size.
Note: Oracle recommends at least 8GB RAM for Grid Installation. I have
allocated 12,5 GB or 12800MB for my installation. For more details, see also
the oracle documentation guides in Appendix.

4. Virtual Disk
Create the virtual disk: VDI, dynamically allocated


5. Shared Ciplboard
Change the Shared Clipboard and Drag and Drop to Bidirectional

6. Number of CPUs
Optionally increase the number oft he CPUs, if your system have enough


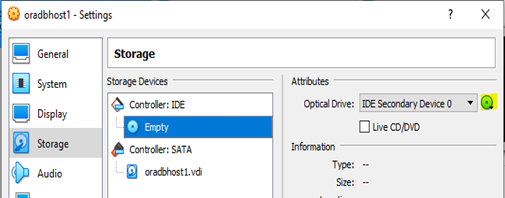
7. Storage: Select the Disk Image .iso for the Installation

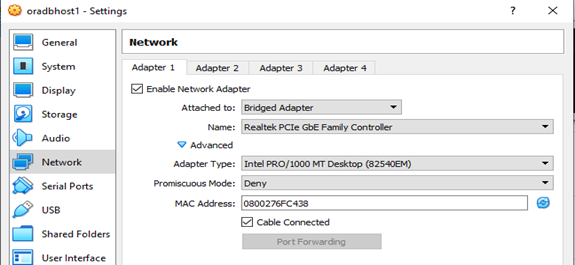
8. Network Settings: For Oracle RAC, you need 3 Adapters
Adapter1: Host-Only, for RAC nodes internal communication, cable connected.


Adapter2: Internal Network, for RAC Private Network
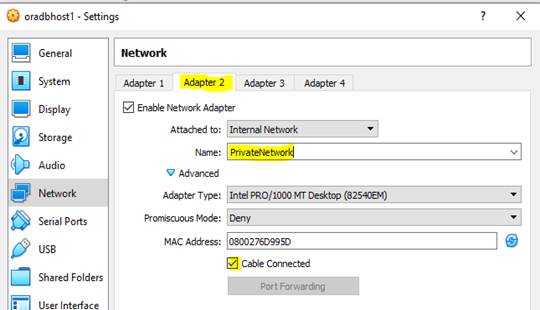
Adapter3: Bridge Adapter, to connect to internet for Installation Purpose


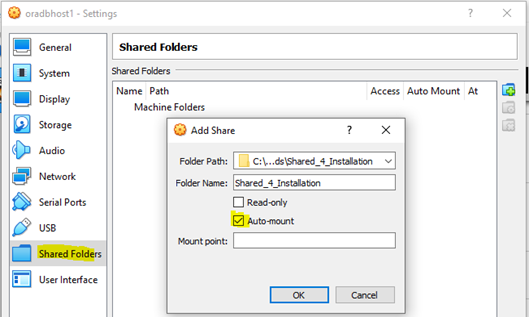
9. Shared Forders:
Add a shared for the Software Installation and log Files for example.
Make sure Auto-mount is checked, Access is full

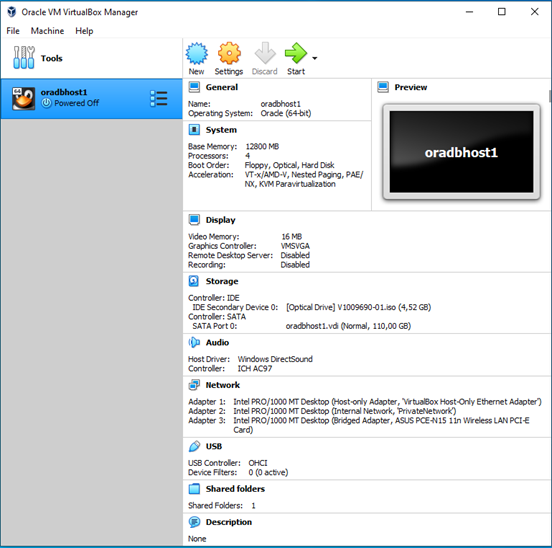
10. Summary settings
Verification before beginning with Linux Installation
Double check the configuration before starting with the Installation
II. Step 2: Oracle Linux 7.9 Installation
Assumptions/Prerequisites
VirtualBox has been setup as described above
1. Start the installation by powering on the virtual machine, with the OS image attached as optical Disk:
Storage --> Storage Devices --> Controller: IDE --> Optical Drive -->
OS image.iso
Note: I skipped the Test option, since i have already used this media for another
Installation.

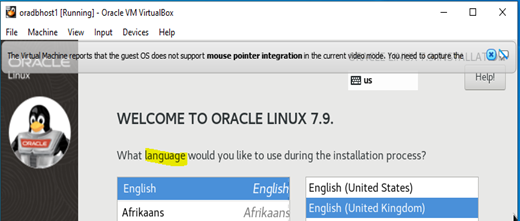
2. Select the Language and Press Continue
3. Change Keyboard, Date&Time and so on

a. Change Keyboard

b. Change Date & Time

4. Software Packages selection
Server with GUI
- Hardware Monitoring Tools
- Network File System Client
- Performance Tools
- Large Systems Performance
- Compatibility Libreairies
- Development Tools
5. Installation Destination modification(I prefer to do a partinionning)


Accept the Changes

6. KDUMP (optionally disabled here for my test lab)

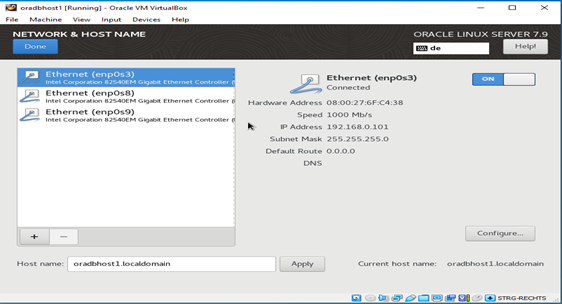
7. Network Settings and Hostname Configuration
a. Adapter 1 – enp0s3 (BridgedAdapter)


b. Adapter 2 – enp0s8 (Private Network) for private interconnect
NOTE: Important!! Make sure that the private network has different subnet

c. Adapter 3 – enp0s9 (Host Only Adapter)

8. Security policy (optionally disabled for my test purposes)

9. Double check and click Begin Installation

10. User settings
Specify root password and create a user (here ooumarou)


11. Finish pre-configuration and start the installation
Check Network connection, license information. Then Click Finish Configuration


Done with the first part of the Installation. Verification and further configuration.


12.1 VirtualBox Guest Additions Installation
Devices --> Insert Guest Additions CD Image --> Run


Press Return to close the Guest Additions Installation

Press Return and then eject the Disk Image

12.2 Additional configuration changes and steps
12.2.1 Display resolution

12.2.2 Screen timeout

13. DHCP configuration of the bridged Adapter for YUM Setup/Update


14. YUM repository Setup and Update
Check the internet connection by pinging oracle.com for example
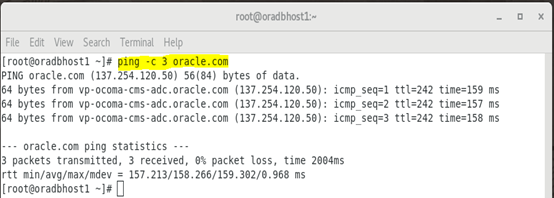
Refenrence:
Download the Latest Oracle Linux Repo File
Oracle are constantly amending the contents of their repository files, so it's a good idea to refresh the repo files from time to time to see the latest entries.
Oracle Linux 7 (Post January 2019)
From January 2019 the previous method of refreshing the Yum repositories has altered. The single large "public-yum-ol7.repo" file has been replaced by a number of smaller, more targetted files. You get these by installing the following package.
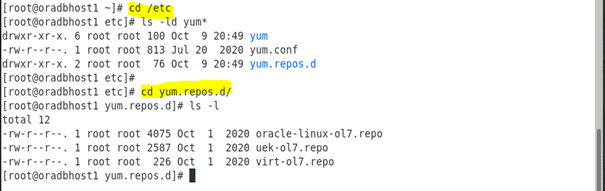
a. Configure YUM repository


b. Run a yum update
# yum update -y

15. Oracle Database Preinstallation for Oracle Database 19c

16. SELINUX: change SELINUX to permisse for firewall issues

17. Yum install oracleasm-support
#yum install -y oracleasm-support

18. Yum install BIND*
#yum install -y bind* -y


19. Further configuration and verification
[root@oradbhost1 yum.repos.d]# cd /etc
[root@oradbhost1 etc]#
[root@oradbhost1 etc]# ls -ld sys*
drwxr-xr-x. 7 root root 4096 Oct 10 00:10 sysconfig
-rw-r--r--. 1 root root 1966 Oct 9 23:57 sysctl.conf
drwxr-xr-x. 2 root root 111 Oct 9 23:57 sysctl.d
drwxr-xr-x. 4 root root 4096 Oct 9 23:47 systemd
lrwxrwxrwx. 1 root root 14 Oct 9 20:48 system-release -> oracle-release
-rw-r--r--. 1 root root 31 Sep 30 2020 system-release-cpe
[root@oradbhost1 etc]#
[root@oradbhost1 etc]# tail -15 sysctl.conf
# oracle-database-preinstall-19c setting for net.core.wmem_max is 1048576
net.core.wmem_max = 1048576
# oracle-database-preinstall-19c setting for net.ipv4.conf.all.rp_filter is 2
net.ipv4.conf.all.rp_filter = 2
# oracle-database-preinstall-19c setting for net.ipv4.conf.default.rp_filter is 2
net.ipv4.conf.default.rp_filter = 2
# oracle-database-preinstall-19c setting for fs.aio-max-nr is 1048576
fs.aio-max-nr = 1048576
# oracle-database-preinstall-19c setting for net.ipv4.ip_local_port_range is
9000 65500
net.ipv4.ip_local_port_range = 9000 65500
[root@oradbhost1 etc]#
[root@oradbhost1 etc]# ls -lrt sysctl.d
total 8
lrwxrwxrwx. 1 root root 14 Oct 9 23:48 99-sysctl.conf -> ../sysctl.conf
-rw-r--r--. 1 root root 449 Oct 9 23:57 99-initial-sysctl.conf
-rw-r--r--. 1 root root 1966 Oct 9 23:57 99-oracle-database-preinstall-19c-
sysctl.conf
[root@oradbhost1 etc]#
[root@oradbhost1 etc]# sysctl -p
fs.file-max = 6815744
kernel.sem = 250 32000 100 128
kernel.shmmni = 4096
kernel.shmall = 1073741824
kernel.shmmax = 4398046511104
kernel.panic_on_oops = 1
net.core.rmem_default = 262144
net.core.rmem_max = 4194304
net.core.wmem_default = 262144
net.core.wmem_max = 1048576
net.ipv4.conf.all.rp_filter = 2
net.ipv4.conf.default.rp_filter = 2
fs.aio-max-nr = 1048576
net.ipv4.ip_local_port_range = 9000 65500
[root@oradbhost1 etc]#
Now the system is ready to create shared Disks for RAC and for other steps (user groups, directories, firewall, NTP configuration, ASM Disks and Diskgroups creation and so on).
III. Step 3: Oracle Linux Post Installation Configuration for RAC (groups, users, DNS, firewall, NTP/Chrony, cloning 1st node, shared Disks, ASM configuration)
1. Groups and directories creation and oracle user permissions modification
1.1 Creating groups
[root@oradbhost1 ~]# date
Sun 10 Oct 08:55:10 CEST 2021
[root@oradbhost1 ~]# cat /etc/group | egrep -i 'asm|vbox'
vboxsf:x:981:
[root@oradbhost1 ~]#
[root@oradbhost1 ~]# groupadd -g 54327 asmdba
[root@oradbhost1 ~]# groupadd -g 54328 asmoper
[root@oradbhost1 ~]# groupadd -g 54329 asmadmin
[root@oradbhost1 ~]#
[root@oradbhost1 ~]# cat /etc/group | egrep -i 'asm|vbox'
vboxsf:x:981:
asmdba:x:54327:
asmoper:x:54328:
asmadmin:x:54329:
[root@oradbhost1 ~]#

1.2 Verifying and modifying oracle user groups
[root@oradbhost1 ~]# id oracle
uid=54321(oracle) gid=54321(oinstall) groups=54321(oinstall),54322(dba),54323(oper),54324(backupdba),54325(dgdba),54326(kmdba),54330(racdba)
[root@oradbhost1 ~]#
[root@oradbhost1 ~]# usermod -G asmdba,asmoper,asmadmin,vboxsf oracle
[root@oradbhost1 ~]#
[root@oradbhost1 ~]# id oracle
uid=54321(oracle) gid=54321(oinstall) groups=54321(oinstall),981(vboxsf),54327(asmdba),54328(asmoper),54329(asmadmin)
[root@oradbhost1 ~]#
1.3 Changing oracle user password
[root@oradbhost1 ~]# passwd oracle
Changing password for user oracle.
New password: xxxxx
Retype new password:
passwd: all authentication tokens updated successfully.
[root@oradbhost1 ~]#
1.4 Creating the directories for ORACLE_BASE, ORACLE_HOME …
[root@oradbhost1 ~]# mkdir -p /u01/app/19.3.0/grid
[root@oradbhost1 ~]# mkdir -p /u01/app/oracle/product/19.3.0/db_1
[root@oradbhost1 ~]# chown -R oracle:oinstall /u01
[root@oradbhost1 ~]# chmod -R 775 /u01/
[root@oradbhost1 ~]#
[root@oradbhost1 ~]# ls -ld /u01
drwxrwxr-x. 3 oracle oinstall 17 Oct 10 09:18 /u01
[root@oradbhost1 ~]#
1.4 Configuring Bash Profiles for oracle or grid user and ENV aliases
I will use only oracle user for both grid infrastructure and RAC database installation, of course with different environment variables. Update the bash profile files respectively.
[root@oradbhost1 ~]# su - oracle
[oracle@oradbhost1 ~]$ ls -la .bash*
-rw-r--r--. 1 oracle oinstall 18 Nov 22 2019 .bash_logout
-rw-r--r--. 1 oracle oinstall 193 Nov 22 2019 .bash_profile
-rw-r--r--. 1 oracle oinstall 231 Nov 22 2019 .bashrc
[oracle@oradbhost1 ~]$ cp .bash_profile .bash_profile.orig
[oracle@oradbhost1 ~]$ vim .bash_profile
[oracle@oradbhost1 ~]$
[oracle@oradbhost1 ~]$ cat .bash_profile
# .bash_profile
# Get the aliases and functions
if [ -f ~/.bashrc ]; then
. ~/.bashrc
fi
# User specific environment and startup programs
PATH=$PATH:$HOME/.local/bin:$HOME/bin
export PATH
# Oracle Settings
export TMP=/tmp
export TMPDIR=$TMP
export ORACLE_HOSTNAME=oradbhost1.localdomain
export ORACLE_UNQNAME=CDBRAC
export ORACLE_BASE=/u01/app/oracle
export GRID_HOME=/u01/app/19.3.0/grid
export DB_HOME=$ORACLE_BASE/product/19.3.0/db_1
export ORACLE_HOME=$DB_HOME
export ORACLE_SID=cdbrac1
export ORACLE_TERM=xterm
export BASE_PATH=/usr/sbin:$PATH
export PATH=$ORACLE_HOME/bin:$BASE_PATH
export LD_LIBRARY_PATH=$ORACLE_HOME/lib:/lib:/usr/lib
export CLASSPATH=$ORACLE_HOME/JRE:$ORACLE_HOME/jlib:$ORACLE_HOME/rdbms/jlib
alias grid_env='. /home/oracle/grid_env'
alias db_env='. /home/oracle/db_env'
[oracle@oradbhost1 ~]$
Create a file called "/home/oracle/grid_env" with the following contents.
[oracle@oradbhost1 ~]$ vim /home/oracle/grid_env
[oracle@oradbhost1 ~]$
[oracle@oradbhost1 ~]$ cat /home/oracle/grid_env
export ORACLE_SID=+ASM1
export ORACLE_HOME=$GRID_HOME
export PATH=$ORACLE_HOME/bin:$BASE_PATH
export LD_LIBRARY_PATH=$ORACLE_HOME/lib:/lib:/usr/lib
export CLASSPATH=$ORACLE_HOME/JRE:$ORACLE_HOME/jlib:$ORACLE_HOME/rdbms/jlib
[oracle@oradbhost1 ~]$
Create a file called "/home/oracle/db_env" with the following contents.
[oracle@oradbhost1 ~]$ vim db_env
[oracle@oradbhost1 ~]$ cat db_env
export ORACLE_SID=cdbrac1
export ORACLE_HOME=$DB_HOME
export PATH=$ORACLE_HOME/bin:$BASE_PATH
export LD_LIBRARY_PATH=$ORACLE_HOME/lib:/lib:/usr/lib
export CLASSPATH=$ORACLE_HOME/JRE:$ORACLE_HOME/jlib:$ORACLE_HOME/rdbms/jlib
[oracle@oradbhost1 ~]$
[oracle@oradbhost1 ~]$ . db_env
[oracle@oradbhost1 ~]$
[oracle@oradbhost1 ~]$ env | grep ORA
ORACLE_UNQNAME=CDBRAC
ORACLE_SID=cdbrac1
ORACLE_BASE=/u01/app/oracle
ORACLE_HOSTNAME=oradbhost1.localdomain
ORACLE_TERM=xterm
ORACLE_HOME=/u01/app/oracle/product/19.3.0/db_1
[oracle@oradbhost1 ~]$
2. Firewall and NTP configuration
2.1 Firewall Stop and Disable
[root@oradbhost1 ~]# systemctl status firewalld.service
[root@oradbhost1 ~]# systemctl stop firewalld.service
[root@oradbhost1 ~]# systemctl disable firewalld.service
[root@oradbhost1 ~]# systemctl status firewalld.service

2.2 Chrony NTP Configuration
[root@oradbhost1 ~]# systemctl status chronyd.service
[root@oradbhost1 ~]# systemctl enable chronyd.service
[root@oradbhost1 ~]# systemctl restart chronyd.service
[root@oradbhost1 ~]# chronyc -a 'burst 4/4'
[root@oradbhost1 ~]# chronyc -a makestep
[root@oradbhost1 ~]# systemctl status chronyd.service

3. DNS Configuration
For RAC Installation the SCAN IPs should be resolvable from a DNS Server. The DNS may be setup on a separate server and this is normally done by the network team in a company.
Also for a RAC Installation in a VirtualBox, a DNS configuration is necessary since the introduction of Single Client Access Name (SCAN), introduced in Oracle RAC11gR2. It can be configured on a separate server or on one of the RAC nodes., better of course on the first node. Thus, I will setup my DNS on the first RAC node.
Note: more specifically, it should be a server installation with a minimum of 8GB swap, firewall disabled, SELinux set to permissive and the following package groups installed.
3.1 Check Bind Packages
[root@oradbhost1 ~]# rpm -qa | grep bind

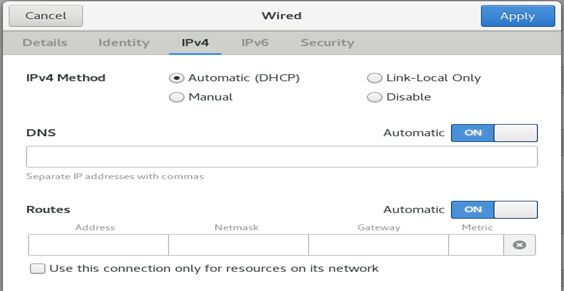
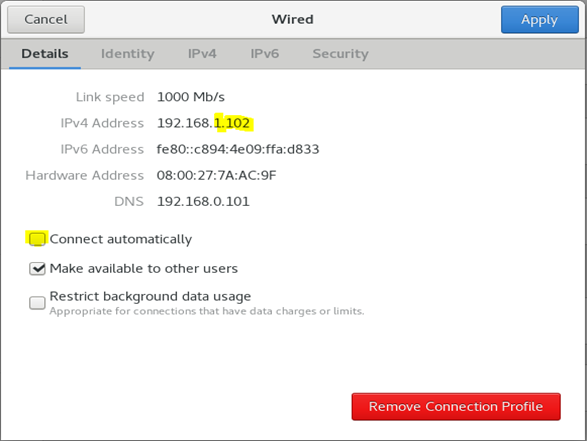
3.2 Check Network Adapter Settings and /etc/hosts
I will set the adapter manually instead of using DHCP, to avoid the IP address to change
First Network Adapter


Second Network Adapter


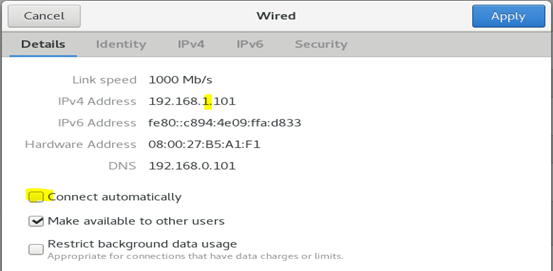
Note: make sure that the private VIP adapter is not connect for the Grid Installation start, otherwise, the grid installation will fail with the cause, that the interface is already used. Important. This Network Adapter should have a different subnet.
Third Network Adapter


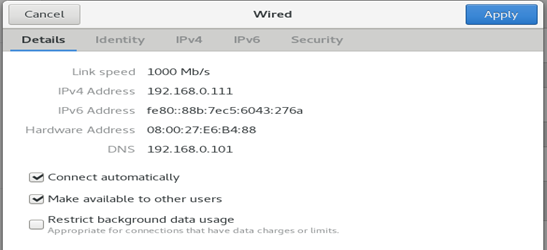
[root@oradbhost1 ~]# ifconfig -a | egrep 'enp0|inet 192'

root@oradbhost1 ~]# cat /etc/hosts

Note: the SCAN Ips are commented. It is just to document ín the /etc/hosts how there are called.
If you are using Dnsmasq, put the RAC-specific entries in the hosts machines
"/etc/hosts" file, with the SCAN entries uncommented, and restart Dnsmasq.
After Checking required packages, and verifying network details and /etc/hosts, you have to configure the name server for DNS name resolution:
/etc/named.conf
/var/named/xxxx.zone files
3.3 Edit the name server configuration
Backup the default named.conf and change it accordingly to your need. The
changes are colored.
[root@oradbhost1 etc]# ls -l named.conf
-rw-r-----. 1 root named 1806 Oct 10 00:10 named.conf
[root@oradbhost1 etc]#
[root@oradbhost1 etc]# cp named.conf named.conf.bak-4-rac19
[root@oradbhost1 etc]# vim named.conf
[root@oradbhost1 etc]# cat named.conf
//
// named.conf
//
// Provided by Red Hat bind package to configure the ISC BIND named(8) DNS
// server as a caching only nameserver (as a localhost DNS resolver only).
//
// See /usr/share/doc/bind*/sample/ for example named configuration files.
//
// See the BIND Administrator's Reference Manual (ARM) for details about the
// configuration located in /usr/share/doc/bind-{version}/Bv9ARM.html
options {
listen-on port 53 { 127.0.0.1; 192.168.0.101; };
listen-on-v6 port 53 { ::1; };
directory "/var/named";
dump-file "/var/named/data/cache_dump.db";
statistics-file "/var/named/data/named_stats.txt";
memstatistics-file "/var/named/data/named_mem_stats.txt";
recursing-file "/var/named/data/named.recursing";
secroots-file "/var/named/data/named.secroots";
allow-query { localhost; };
forwarders {192.168.0.1;};
/*
- If you are building an AUTHORITATIVE DNS server, do NOT enable recursion.
- If you are building a RECURSIVE (caching) DNS server, you need to enable recursion.
- If your recursive DNS server has a public IP address, you MUST enable access
control to limit queries to your legitimate users.
Failing to do so will cause your server to become part of large scale DNS
amplification attacks. Implementing BCP38 within your network would greatly
reduce such attack surface
*/
recursion yes;
dnssec-enable yes;
dnssec-validation yes;
/* Path to ISC DLV key */
bindkeys-file "/etc/named.root.key";
managed-keys-directory "/var/named/dynamic";
pid-file "/run/named/named.pid";
session-keyfile "/run/named/session.key";
};
logging {
channel default_debug {
file "data/named.run";
severity dynamic;
};
};
zone "." IN {
type hint;
file "named.ca";
};
zone "localdomain" IN {
type master;
file "localdomain.zone";
allow-update { none; };
};
zone "0.168.192.in-addr.arpa." IN {
type master;
file "0.168.192.in-addr.arpa";
allow-update { none; };
};
include "/etc/named.rfc1912.zones";
include "/etc/named.root.key";
[root@oradbhost1 etc]#
Another command to check the entries in /etc/named.conf
[root@oradbhost1 etc]# echo ' '; echo 'listen ports and forwarders';echo '-------
--------------------'; head -25 named.conf | egrep 'listen-on|forwarders';
echo ' '; echo '----------------------------- '; echo 'localdomain and
0.168.192.xxxx ';echo '-----------------------------'; echo ' '; tail -20 named.conf

The "file" parameter specifies the name of the file in the "/var/named/" directory that contains the configuration for this zone.
If you only care about forward lookups then you are now finished with the "/etc/named.conf" file. If you want to also cope with reverse lookups you will need to add an extra zone to cope with those. In the case of a RAC installation, I want to create reverse lookups for my public (192.168.0.*) network, so I must add the following zone entry.
Create the forward and reverse zone files as mentioned in named.conf, in the line file, as in this case:
forward zone = localdomain.zone
reverse zone = 0.168.192localdomain.zone
3.4 Edit the /var/named/xxxx.zone files
Forward zone (localdomain.zone) in /var/named
[root@oradbhost1 named]# vim localdomain.zone
[root@oradbhost1 named]# cat localdomain.zone
$TTL 86400
@ IN SOA oradbhost1.localdomain. root.localdomain.(
42 ; serial (d. adams)
3H ; refresh
15M ; retry
1W ; expiry
1D ) ; minimum
@ IN NS oradbhost1.localdomain.
localhost IN A 127.0.0.1
oradbhost1.localdomain. IN A 192.168.0.101
oradbhost2.localdomain. IN A 192.168.0.102
oradbhost1-priv.localdomain. IN A 192.168.1.101
oradbhost2-priv.localdomain. IN A 192.168.1.102
oradbhost1-vip.localdomain. IN A 192.168.0.111
oradbhost2-vip.localdomain. IN A 192.168.0.112
oradbhost-scan.localdomain. IN A 192.168.0.103
oradbhost-scan.localdomain. IN A 192.168.0.104
oradbhost-scan.localdomain. IN A 192.168.0.105
[root@oradbhost1 named]#

Reverse zone (0.168.192.in-addr.arpa) in /var/named
[root@oradbhost1 named]# vim 0.168.192.in-addr.arpa
[root@oradbhost1 named]# cat 0.168.192.in-addr.arpa
$TTL 86400
$ORIGIN 0.168.192.in-addr.arpa.
@ IN SOA oradbhost1.localdomain. root.localdomain.( 2
3H
1H
1W
1H )
@ IN NS oradbhost1.localdomain.
@ IN PTR localdomain.
oradbhost1 IN A 192.168.0.101
oradbhost2 IN A 192.168.0.102
oradbhost1-vip IN A 192.168.0.111
oradbhost2-vip IN A 192.168.0.112
oradbhost-scan IN A 192.168.0.103
oradbhost-scan IN A 192.168.0.104
oradbhost-scan IN A 192.168.0.105
102 IN PTR oradbhost2.localdomain.
111 IN PTR oradbhost1-vip.localdomain.
112 IN PTR oradbhost2-vip.localdomain.
103 IN PTR oradbhost-scan.localdomain.
104 IN PTR oradbhost-scan.localdomain.
105 IN PTR oradbhost-scan.localdomain.
[root@oradbhost1 named]#

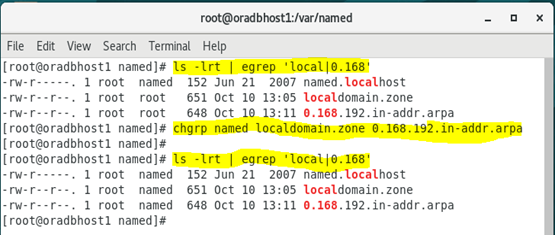
NOTE: the created files have root group and this need to be changed to named group.
a) Change the root group to named group
[root@oradbhost1 named]# ls -lrt | egrep 'local|0.168'
[root@oradbhost1 named]# chgrp named localdomain.zone 0.168.192.in-addr.arpa
[root@oradbhost1 named]# ls -lrt | egrep 'local|0.168'
[root@oradbhost1 named]#
a) Verify the context of the files under
[root@oradbhost1 named]# ls -lZd /etc/named.conf
It should be in the context of named_conf_t. If its different than this then we need to restore the context using:
[root@oradbhost1 named]# restorecon /etc/named.conf
[root@oradbhost1 named]# ls -lZd /etc/named.conf
-rw-r-----. root named system_u:object_r:named_conf_t:s0 /etc/named.conf
[root@oradbhost1 named]#
Start the DNS Service, check the status and correct potential errors
[root@oradbhost1 named]# systemctl status named.service
[root@oradbhost1 named]# systemctl start named.service
[root@oradbhost1 named]# systemctl status named.service
[root@oradbhost1 named]# systemctl enable named.service

In case of errors, use journalctl -xe for trouble shooting

3.5 Deploy iptables Rules to allow DNS service
If you have the Linux firewall enabled, you will need to disable or configure it, as shown here or here. The following is an example of disabling the firewall.
# service iptables status
# service iptables stop
# chkconfig iptables off
For more see also:
Example adding iptables rules could be
# iptables -A INPUT -i lo -j ACCEPT #iptables -A INPUT -m state –state ESTABLISHED,RELATED -j ACCEPT #iptables -A INPUT -p tcp -m state –state NEW -m tcp –dport 22 -j ACCEPT #iptables -A INPUT -p tcp -m state –state NEW -m tcp –dport 53 -j ACCEPT #iptables -A INPUT -p udp -m state –state NEW -m udp –dport 53 -j ACCEPT #iptables -A INPUT -j DROP
I got some errors. Check the syntax

3.6 Make the DNS server’s own IP address in the below file
The DNS server is now running, but each server must be told to use it. This is done by editing the "/etc/resolv.conf" file on each server, including the RAC nodes. Make sure the file contains the following entries, where the IP address and domain match those of your DNS server and the domain you have configured. For more see also for example this:
Make sure the "/etc/resolv.conf" file includes a nameserver entry that points to the correct nameserver. Also, if the "domain" and "search" entries are both present, comment out one of them. For this installation my "/etc/resolv.conf" looked like this.
[root@oradbhost1 named]# cat cat /etc/resolv.conf

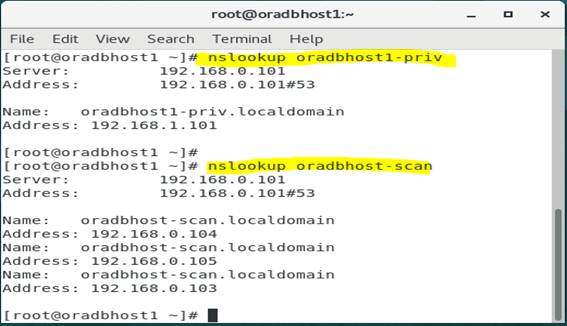
Now Check for the Available Hosts in DNS. Important the SCAN IPs should be resolvable through DNS
[root@oradbhost1 ~]# nslookup oradbhost1-priv
Server: 192.168.0.101
Address: 192.168.0.101#53
Name: oradbhost1-priv.localdomain
Address: 192.168.1.101
[root@oradbhost1 ~]#
[root@oradbhost1 ~]# nslookup oradbhost-scan
Server: 192.168.0.101
Address: 192.168.0.101#53
Name: oradbhost-scan.localdomain
Address: 192.168.0.104
Name: oradbhost-scan.localdomain
Address: 192.168.0.105
Name: oradbhost-scan.localdomain
Address: 192.168.0.103
[root@oradbhost1 ~]#
4. Clone the 1st by Export/Import Appliance
Backup VMbox for build 2nd Node and adding Diskgroup
Now we will shut down the first node/server and clone it.
[root@oradbhost1 ~]# shutdown -h now
Or just
#init 0
4.1 Export Appliance
Export Appliance
Then go to File à Export Applicance

Select the location of backup and click NEXT


Then select Export

4.2 Import Appliance
Then go to File à Import Appliance

Then Import Appliance and change the VirtualBox Name, Storage location


5. Shared Disks creation and configuration
Note: You can create shared disks from VirtualBox Menu or on command line. I created the disks using the second option (on windows cmd)
5.1 Create shared disks
cd D:\VboxSharedDisks-D
"c:\Program Files\Oracle\VirtualBox\VBoxManage" createhd --filename ocr.vdi --size 15360 --format VDI --variant Fixed
"c:\Program Files\Oracle\VirtualBox\VBoxManage" createhd --filename mgmt.vdi --size 35840 --format VDI --variant Fixed
"c:\Program Files\Oracle\VirtualBox\VBoxManage" createhd --filename data.vdi --size 10240 --format VDI --variant Fixed
"c:\Program Files\Oracle\VirtualBox\VBoxManage" createhd --filename fra.vdi --size 20480 --format VDI --variant Fixed

5.2 Make the Disks shareable
"c:\Program Files\Oracle\VirtualBox\VBoxManage" modifyhd ocr.vdi --type shareable
"c:\Program Files\Oracle\VirtualBox\VBoxManage" modifyhd mgmt.vdi --type shareable
"c:\Program Files\Oracle\VirtualBox\VBoxManage" modifyhd data.vdi --type shareable
"c:\Program Files\Oracle\VirtualBox\VBoxManage" modifyhd fra.vdi --type shareable

5.3 Attach the ASM disks to both node
Attach the ASM disks to node oradbhost1
"c:\Program Files\Oracle\VirtualBox\VBoxManage" storageattach oradbhost1 --storagectl "SATA" --port 1 --device 0 --type hdd --medium ocr.vdi --mtype shareable
"c:\Program Files\Oracle\VirtualBox\VBoxManage" storageattach oradbhost1 --storagectl "SATA" --port 2 --device 0 --type hdd --medium mgmt.vdi --mtype shareable
"c:\Program Files\Oracle\VirtualBox\VBoxManage" storageattach oradbhost1 --storagectl "SATA" --port 3 --device 0 --type hdd --medium data.vdi --mtype shareable
"c:\Program Files\Oracle\VirtualBox\VBoxManage" storageattach oradbhost1 --storagectl "SATA" --port 4 --device 0 --type hdd --medium fra.vdi --mtype shareable
Attach the ASM disks to node oradbhost2
"c:\Program Files\Oracle\VirtualBox\VBoxManage" storageattach oradbhost2 --storagectl "SATA" --port 1 --device 0 --type hdd --medium ocr.vdi --mtype shareable
"c:\Program Files\Oracle\VirtualBox\VBoxManage" storageattach oradbhost2 --storagectl "SATA" --port 2 --device 0 --type hdd --medium mgmt.vdi --mtype shareable
"c:\Program Files\Oracle\VirtualBox\VBoxManage" storageattach oradbhost2 --storagectl "SATA" --port 3 --device 0 --type hdd --medium data.vdi --mtype shareable
"c:\Program Files\Oracle\VirtualBox\VBoxManage" storageattach oradbhost2 --storagectl "SATA" --port 4 --device 0 --type hdd --medium fra.vdi --mtype shareable

Verify shareable disks are attached on both nodes


6. Re-configure the 2nd node oradbhost2
6.1 Change hostname
Start the 2nd node and change hostname, IP addresses settings and so on
[root@oradbhost1 ~]# nmcli general hostname
[root@oradbhost1 ~]# nmcli general hostname oradbhost2.localdomain
[root@oradbhost1 ~]# nmcli general hostname
[root@oradbhost1 ~]# service systemd-hostnamed restart
Redirecting to /bin/systemctl restart systemd-hostnamed.service
[root@oradbhost1 ~]# hostname

6.2 Change Network


Restart the network and verify ifconfig
[root@oradbhost2 ~]# systemctl restart network
[root@oradbhost2 ~]# ifconfig -a | egrep 'enp0|inet 192'

Start the 1st node and check connectivity

[root@oradbhost2 ~]# hostname
[root@oradbhost2 ~]# ping -c 3 oradbhost1
[root@oradbhost2 ~]# ping -c 3 oradbhost1-vip
Error on node 2: ping is working fine but nslookup/dig fails
[root@oradbhost2 ~]# nslookup oradbhost1
Server: 192.168.0.101
Address: 192.168.0.101#53
** server can't find oradbhost1: REFUSED
[root@oradbhost2 ~]# dig oradbhost1
; <<>> DiG 9.11.4-P2-RedHat-9.11.4-26.P2.el7_9.7 <<>> oradbhost1
;; global options: +cmd
;; Got answer:
;; ->>HEADER<<- opcode: QUERY, status: REFUSED, id: 23124
……..
[root@oradbhost2 ~]#

7. Copy and unpack the grid software in $GRID_HOME
[oracle@oradbhost1 ~]$ . grid_env
[oracle@oradbhost1 ~]$
[oracle@oradbhost1 ~]$ cd $GRID_HOME
[oracle@oradbhost1 grid]$
[oracle@oradbhost1 grid]$ ls -l
total 2821472
-rwxr-x---. 1 oracle oinstall 2889184573 Oct 10 19:51 LINUX.X64_193000_grid_home.zip
[oracle@oradbhost1 grid]$
[oracle@oradbhost1 grid]$
[oracle@oradbhost1 grid]$ unzip LINUX.X64_193000_grid_home.zip
Archive: LINUX.X64_193000_grid_home.zip

Install the package cvudisk from the grid home as the “root” user on all nodes.
1st Node
[root@oradbhost1 ~]# cd /u01/app/19.3.0/grid/cv/rpm
[root@oradbhost1 rpm]# rpm -Uvh cvuqdisk-1.0.10-1.rpm
Preparing... ############################ [100%]
Using default group oinstall to install package
Updating / installing...
1:cvuqdisk-1.0.10-1 ############################ [100%]
[root@oradbhost1 rpm]#
2nd Node
[root@oradbhost1 rpm]# scp cvuqdisk-1.0.10-1.rpm oradbhost2:
[root@oradbhost1 rpm]# ssh oradbhost2
[root@oradbhost2 ~]# ls -l cvuqdisk-1.0.10-1.rpm
[root@oradbhost2 ~]# rpm -Uvh cvuqdisk-1.0.10-1.rpm
Preparing... ################################# [100%]
Using default group oinstall to install package
Updating / installing...
1:cvuqdisk-1.0.10-1 ################################# [100%]
[root@oradbhost2 ~]#
[root@oradbhost2 ~]# rm -rf cvuqdisk-1.0.10-1.rpm
[root@oradbhost2 ~]# exit
[root@oradbhost1 rpm]#
8. Formatting ASM Disks for ASM Diskgroups configuration
[root@oradbhost1 ~]# cd /dev
[root@oradbhost1 dev]# ls sd*
sda sda1 sda2 sdb sdc sdd sde
[root@oradbhost1 dev]#
[root@oradbhost1 dev]# fdisk /dev/sdb
Welcome to fdisk (util-linux 2.23.2).
. . . . . . . . . . .
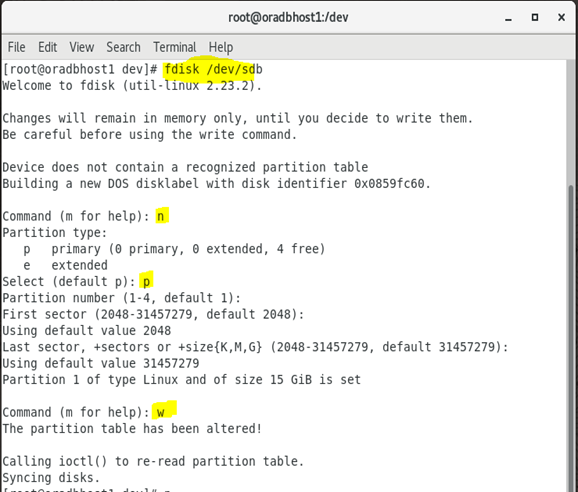
Repeat for all disks
fdisk /dev/sdc, fdisk /dev/sdd, fdisk /dev/sde
At the end you will all partitions ending with 1
[root@oradbhost1 dev]# ls sd*
sda sda1 sda2 sdb sdb1 sdc sdc1 sdd sdd1 sde sde1
[root@oradbhost1 dev]#
9. Configure ASMLib
9.1 Configure oracleasm utility
[root@oradbhost1 dev]#/usr/sbin/oracleasm configure -i

This can be verified using:
[root@oradbhost1 dev]#/usr/sbin/oracleasm configure

Initialize the asmlib with the oracleasm init command to load oracleasm module and mount the oracleasm filesystem:-
[root@oradbhost1 dev]# /usr/sbin/oracleasm init
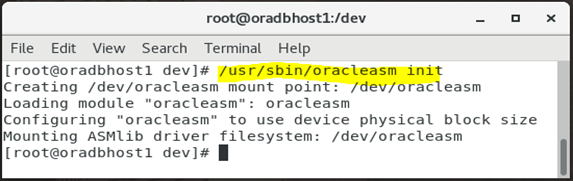
ASMLIB Configuration create and mount /dev/oracleasm
[root@oradbhost1 dev]# df -ha | grep -i oracleasm

Verify that the created ASM disks are attached to both nodes, as shareable


10. ASM Disks creation for bildung ASM Diskgroups
10.1 ASM Configuration on Node 1
Create the disks on the filesystem
[root@oradbhost1 dev]# oracleasm createdisk OCR_DISK /dev/sdb1
[root@oradbhost1 dev]# oracleasm createdisk MGMT_DISK /dev/sdc1
[root@oradbhost1 dev]# oracleasm createdisk DATA_DISK1 /dev/sdd1
[root@oradbhost1 dev]# oracleasm createdisk FRA_DISK /dev/sde1
[root@oradbhost1 dev]#

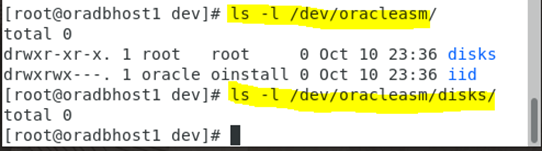
Verify the disks existence
[root@oradbhost1 dev]# ls -l /dev/oracleasm/disks/

Scan and list them with oracleasm utilities on both nodes

10.2 ASM Configuration on Node 2


11. Setup SSH Passwordless
Unzip the grid infrastructure software in $GRID_HOME and run the sshUserSetup.sh script to setup passwordless SSH. Then verify that oracle user can ssh passwordless to the second node
[root@oradbhost1 deinstall]# ./sshUserSetup.sh -user oracle -hosts "oradbhost1 oradbhost2" -noPromptPassphrase -confirm -advanced
The output of this script is also logged into /tmp/sshUserSetup_2021-10-11-00-12-08.log

SSH from node 2 to node 1

Now both Server are configured to use ASM. Next step is the grid infrastructure installation, see part 2 of 2:
https://ousseinioumarou68.wixsite.com/oracledbexperiences/post/oracle-rac-19c-installation-grid-and-database-installation


Kommentare